Building
Prerequisites
cmake ≥ 3.13
automake
libtool
pkg-config
gcc ≥ 7 , or intel compiler (≥ 2018), or Clang (≥ 7)
wget (to download dependencies; the flag
--use-predownloadcan be used to bypass this dependency)
Optional requirements are:
An OpenMP-enabled compiler (with OpenMP >= 2.0)
ARES does not require any preinstalled external libraries; it will download and compile all necessary dependencies by default.
Python scripts have been tested with the following:
Python == 3.5
healpy == 1.10.3 (Guilhem has also a special version of healpy on Github here)
HDF5Py == 2.7.0
Numexpr == 2.6.2
Numba == 0.33.0 - 0.35.0
In addition the vtktools binding in ares_tools has been used with Paraview ≥ 5.2 . It should be safe to use to upload data into paraview from numpy arrays.
Downloading and setting up for building
The first step to obtain and build ares is to clone the git repository for bitbucket. On some supercomputing system, it is impossible to access internet directly. The first clone should then be on your laptop/workstation and then replicate it on the distant machine. Please check next section for more details. If the computer has access to internet this is easy:
git clone --recursive git@bitbucket.org:bayesian_lss_team/ares.git
Note that if you forget the “–recursive” option either start from scratch or do a
git submodule init; git submodule update
Then you may want to choose a branch that interest you. At the time of this writing (April 13th, 2021), there are 4 “main” branches:
main (the bleeding edge variant of ARES)
release/1.0
release/2.0alpha
release/2.1
The release/* branches are stable, which means the existing code cannot
change significatively notably to alter API or features. Bug fixes can still go
in there, and exceptionally some late merging of features. The general advice
when starting is branch against the latest revision. Though if you particularly
need a feature of main. There are of course lots of other sub-branches
for the different features and other development branches of each member of the
collaboration.
Normally you will want to choose . Otherwise you may change branch
by running git checkout THE_BRANCH_NAME_THAT_YOU_WANT. Once you are
on the branch that you want you may run the get-aquila-modules.sh
script. The first step consists in running
bash get-aquila-modules.sh --clone, this will clone all the
classical Aquila private modules in the “extra/” subdirectory. The
second step is to ensure that all branches are setup correctly by
running bash get-aquila-modules.sh --branch-set.
Now that the modules have been cloned and setup we may now move to building.
As a word of caution, Do not touch the gitmodules files. Whenever you need to do changes create a new branch in either of the main repository or the modules and work in that branch.
sync submodules:
cd ares
git submodule sync
git submodule update --init --recursive
Supercomputer without outgoing access to internet
If the supercomputer does not accept to let you create connection to internet (i.e. TGCC in France), things are bit more complicated. The first clone of ares and its modules should be done on your laptop/workstation. Make it a clean variant for example:
git clone --recursive git@bitbucket.org:bayesian_lss_team/ares.git ares_clean
Then proceed again with
bash get-aquila-modules.sh --clone
bash get-aquila-modules.sh --branch-set
bash build.sh --download-deps
Now replicate that tree to the computer:
cd ..
rsync -av ares_clean THE_COMPUTER:
And now you can proceed as usual for building
However for updating later the GIT tree later, we have two special commands available in get-aquila-modules.sh. On your laptop/workstation, run the following from the ares top source directory:
bash get-aquila-modules.sh --send-pack THE_COMPUTER ares_clean origin
This will send the content of the current git tree (including the
registered modules in .aquila-modules) from the remote origin to
remote directory ares_clean on the computer THE_COMPUTER.
However the checked out branch will not be remotely merged! A second
operation is required. Now login on the distant computer and run
bash get-aquila-modules.sh --local-merge origin
This will merge all the corresponding branches from origin to the checked out branches. If everything is ok you should not get any error messages. Error can happen if you modified the branches in an incompatible way. In that case you have to fix the git merge in the usual way (edit files, add them, commit).
The build.sh script
To help with the building process, there is a script called build.sh in the top directory. It will ensure cmake is called correctly with all the adequate parameters. At the same time it does cleaning of the build directory if needed.
The most basic scenario for building is the following:
bash build.sh
bash build.sh --download-deps
cd build
make
Please pay attention warnings and error messages. The most important are color marked. Notably some problems may occur if two versions of the same compiler are used for C and C++.
The full usage is the following (obtained with bash build.sh -h):
Ensure the current directory is ARES
This is the build helper. The arguments are the following:

--cmake CMAKE_BINARY    instead of searching for cmake in the path,
  use the indicated binary

--without-openmp        build without openmp support (default with)
--with-mpi              build with MPI support (default without)
--c-compiler COMPILER   specify the C compiler to use (default to cc)
--cxx-compiler COMPILER specify the CXX compiler to use (default to c++)
--julia JULIA_BINARY    specify the full path of julia interpreter
--build-dir DIRECTORY   specify the build directory (default to "build/" )
--debug                 build for full debugging
--no-debug-log          remove all the debug output to increase speed on parallel
                        filesystem.
--perf                  add timing instructions and report in the log files

--extra-flags FLAGS     extra flags to pass to cmake
--download-deps         Predownload dependencies
--use-predownload       Use the predownloaded dependencies. They must be in
                        downloads/
--no-predownload        Do not use predownloaded dependencies in downloads/
--purge                 Force purging the build directory without asking
                        questions.
--native                Try to activate all optimizations supported by the
                        running CPU.
--python[=PATH]         Enable the building of the python extension. If PATH
                        is provided it must point to the executable of your
                        choice for (e.g `/usr/bin/python3.9`)
--with-julia            Build with Julia support (default false)
--hades-python          Enable hades-python (implies --python)
--skip-building-tests   Do not build all the tests

Advanced usage:

--eclipse                Generate for eclipse use
--ninja                  Use ninja builder
--update-tags            Update the TAGS file
--use-system-boost[=PATH] Use the boost install available from the system. This
                          reduces your footprint but also increases the
                          possibilities of miscompilation and symbol errors.
--use-system-fftw[=PATH] Same but for FFTW3. We require the prefix path.
--use-system-gsl         Same but for GSL
--use-system-eigen=PATH  Same but for EIGEN. Here we require the prefix path of
                         the installation.
--use-system-hdf5[=PATH] Same but for HDF5. Require an HDF5 with C++ support.
                         The path indicate the prefix path of the installation of HDF5
                         (e.g. /usr/local or /usr). By default it will use
                         environment variables to guess it (HDF5_ROOT)

After the configuration, you can further tweak the configuration using ccmake
(if available on your system).
Note that on some superclusters it is not possible to download files from internet. You can only push data using SSH, but not run any wget, curl or git pull. To account for that limitation, there are two options: “download-deps” and “use-predownload”. You should run “bash build.sh –download-deps” on, e.g., your laptop or workstation and upload the created “downloads” directory into the ARES source tree on the supercomputer without touching anything inside that directory. Once you did that you can build on the supercomputer login node, by adding “–use-predownload” flag to build.sh in addition to others that you need. If you want to compile with full MPI support, you have to give ‘–with-mpi’ as an argument to build.sh.
If you have built ARES before grabbing all the extra modules, it is fine
you can still recover your previous build. For that just go to your
build directory and run ${CMAKE} . with ${CMAKE} being the cmake
executable that you have used originally. If you did not specify
anything just use ‘cmake’.
A typical successful completion of the configuration ends like that:
Configuration done.
Move to /home/lavaux/PROJECTS/ares/build and type 'make' now.
Please check the configuration of your MPI C compiler. You may need
to set an environment variable to use the proper compiler.
Some example (for SH/BASH shells):
   OpenMPI:
   OMPI_CC=cc
   OMPI_CXX=c++
   export OMPI_CC OMPI_CXX
It tells you that you should move to the build directory (by default it is a subdirectory called “build/” in the root of the ARES source code). There is a potential pitfall when using some MPI C compiler. They have been installed by the system administrator to work by default with another compiler (for example Intel C Compiler) though they work completely fine also with another one (like GCC). In that case you have to force the MPI C compiler to use the one that you chose with the indicated environment variable, otherwise you will risk having inconsistent generated code and errors at the final binary building.
cd build ; make
Note
Use make parallelism if possible using the ‘-j’option. The number indicates the number of CPU cores to use in parallel to compile all the source code. For example
make all -j4to compile using 4 parallel tasks. We have not yet caught all the detailed dependencies and it may happen there is a failure. Just execute ‘make’ again to ensure that everything is in order (it should be).Use
make VERBOSE=1to see exactly what the compilation is doing
Upon success of the compilation you will find executables in the src/ subdirectory. Notably:
./src/ares3
Git procedures
General checkup / management
bash get-aquila-modules.sh --status
!!!!!!!!!!!!!!!!!!!!!!!!!!!!!!!!!!!!!!!!!!!!!!!!!!!!!!!!!!!!!!!!!!!!!!!!
This script can be run only by Aquila members.
if your bitbucket login is not accredited the next operations will fail.
!!!!!!!!!!!!!!!!!!!!!!!!!!!!!!!!!!!!!!!!!!!!!!!!!!!!!!!!!!!!!!!!!!!!!!!!
Checking GIT status...
Root tree   (branch master) : good. All clear.
Module ares_fg (branch master) : good. All clear.
Module borg    (branch master) : good. All clear.
Module dm_sheet    (branch master) :  good. All clear.
Module hades   (branch master) :  good. All clear.
Module hmclet  (branch master) :  good. All clear.
Git submodules
Contents of file ‘BASE/ares/.gitmodules’
[submodule 'external/cosmotool']
    path = external/cosmotool
    url = https://bitbucket.org/glavaux/cosmotool.git
Frequently Encountered Problems (FEP)
Non-linked files
Problem
Not being able to compile after transferring to a supercluster
Error as following:
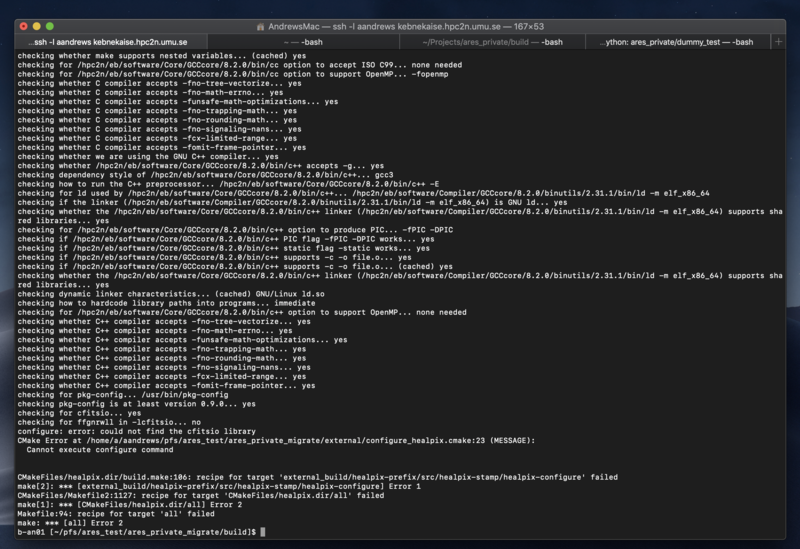
Terminal_output.png
Complains about not finding cfitsio in external/cfitsio while the cfitsio is actually in external/cfitsio.
Folder external/cfitsio:
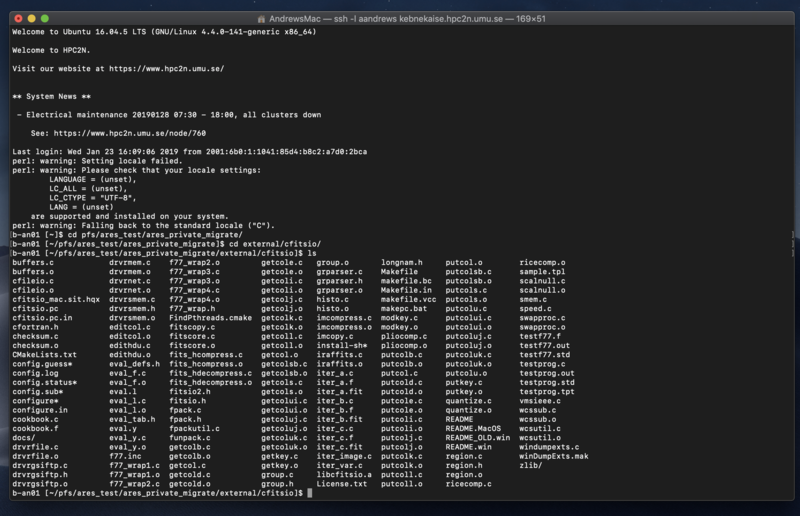
Terminal_output-2.png
Solution
Purging all the .o and .a in external/cfitsio, and force a rebuild of libcfitsio by removing the file {BUILD}/external_build/cfitsio-prefix/src/cfitsio-stamp/cfitsio-build and type make
MPI_CXX not found
Problem
MPI_C is found but MPI_CXX is not found by CMake. The output of build.sh contains something like:
-- Found MPI_C: /path/to/libmpi.so (found version "3.1")
-- Could NOT find MPI_CXX (missing: MPI_CXX_WORKS)
-- Found MPI_Fortran: /path/to/libmpi_usempif08.so (found version "3.1")
Solution
You probably have two versions of MPI (the one you intend to use, e.g.
your installation of OpenMPI) and one which pollutes the environment
(e.g. your anaconda). Therefore the compilation of the MPI C++ test
program (build/CMakeFiles/FindMPI/test_mpi.cpp) by CMake fails. To
troubleshoot:
Check the commands that defined your environment variables using
set | grep -i MPI
check the paths used in
CPATH,CPP_FLAGS, etc. for spurious MPI headers (e.g.mpi.h)control the file
build/CMakeFiles/CMakeError.txtif it exists
Building at HPC facilities
First, if possible, clone ARES base directory with git on the target system:
git clone git@bitbucket.org:bayesian_lss_team/ares.git
Initialize the submodules:
cd ares
git submodule init
git submodule update
Obtain the additional Aquila modules:
bash get-aquila-modules.sh --clone
Here either on your laptop/workstation or on the target system if it allows all outgoing internet connection you can run the following command:
bash build.sh --download-deps
A typical problem is that some of the dependencies have not been downloaded correctly. You should check if all dependencies are available in the directory “/downloads”. If you downloaded on your local computer, you must upload downloads directory on the target system in the ares/downloads subdirectory.
Check which modules are available
module avail
Choose the compiler or build environment. Also load the CMake module and Python3.
Important note: The intel compiler requires basic infrastructure provided by GCC. Default environment may be very old and thus a modern Intel Compiler (19 or 20) would be using old libraries from GCC 4.x. You have to load the gcc compiler first (gcc>7.x) and then load the intel compiler. You can check the compatibility with “icc -v” and see the version of gcc that is used by intel.
Permissions, quota, etc
Some supercomputing facilities has peculiar quota system. You have to belong to a group to get access to full disk quota (e.g. TGCC in France). You can switch groups using “newgrp name_of_the_group” and excecute all commands in the spawn shell.
External HDF5 not found
Problem
When running build.sh (particularly with the flag
--use-system-hdf5), cmake gives some errors, such as
CMake Error: The following variables are used in this project, but they are set to NOTFOUND.
Please set them or make sure they are set and tested correctly in the CMake files:
HDF5_CXX_INCLUDE_DIR (ADVANCED)

CMake Error in libLSS/CMakeLists.txt:
  Found relative path while evaluating include directories of "LSS":

    "HDF5_CXX_INCLUDE_DIR-NOTFOUND"
Solution
HDF5 must be compiled with the flags
--enable-sharedand--enable-cxx.the environment variable
HDF5_ROOTmust point to the HDF5 prefix directory, and cmake should use it from version 3.12 (see also cmake policy CMP0074 and this commit 2ebe5e9).
Installing BORG for the Aquila meeting (May 2020)
This note provides a step by step instruction for downloading and installing the BORG software package. This step-by-step instruction has been done using a MacBook Air running OS X El Capitan. I encourage readers to modify this description as may be required to install BORG on a different OS. Please indicate all necessary modifications and which OS was used.
Some prerequisites
The total installation will take approximately 7-8 GByte of disk space. Software prerequisites:
cmake≥ 3.10 automake libtool pkg-config gcc ≥ 7 , or intel compiler (≥
2018), or Clang (≥ 7) wget (to download dependencies; the flag
–use-predownload can be used to bypass this dependency if you already
have downloaded the required files in the downloads directory)
Clone the repository from BitBucket
To clone the ARES repository execute the following git command in a
console:
{r, engine='bash', count_lines} git clone --recursive git@bitbucket.org:bayesian_lss_team/ares.git
After the clone is successful, you shall change directory to ares,
and execute:
bash get-aquila-modules.sh --clone
Ensure that correct branches are setup for the submodules using:
bash get-aquila-modules.sh --branch-set
If you want to check the status of the currently checked out ARES and its modules, please run:
bash get-aquila-modules.sh --status
You should see the following output:
!!!!!!!!!!!!!!!!!!!!!!!!!!!!!!!!!!!!!!!!!!!!!!!!!!!!!!!!!!!!!!!!!!!!!!!!
This script can be run only by Aquila members.
if your bitbucket login is not accredited the next operations will fail.
!!!!!!!!!!!!!!!!!!!!!!!!!!!!!!!!!!!!!!!!!!!!!!!!!!!!!!!!!!!!!!!!!!!!!!!!
Checking GIT status...

Root tree    (branch master) : good. All clear.
Module ares_fg  (branch master) : good. All clear.
Module borg (branch master) : good. All clear.
Module dm_sheet (branch master) : good. All clear.
Module hades    (branch master) : good. All clear.
Module hmclet   (branch master) : good. All clear.
Module python   (branch master) : good. All clear.
Building BORG
To save time and bandwidth it is advised to pre-download the dependencies that will be used as part of the building procedure. You can do that with
bash build.sh --download-deps
That will download a number of tar.gz which are put in the
downloads/ folder.
Then you can configure the build itself:
bash build.sh --cmake CMAKE_BINARY --c-compiler YOUR_PREFERRED_C_COMPILER --cxx-compiler YOUR_PREFERRED_CXX_COMPILER --use-predownload
Add --with-mpi to add MPI support. E.g. (This probably needs to be
adjusted for your computer.):
bash build.sh --cmake /usr/local/Cellar/cmake/3.17.1/bin/cmake --c-compiler /usr/local/bin/gcc-10 --cxx-compiler /usr/local/bin/g++-10 --use-predownload
Once the configure is successful you should see a final output similar to this:
------------------------------------------------------------------

Configuration done.
Move to /Volumes/EXTERN/software/borg_fresh/ares/build and type 'make' now.
Please check the configuration of your MPI C compiler. You may need
to set an environment variable to use the proper compiler.

Some example (for SH/BASH shells):
- OpenMPI:
    OMPI_CC=/usr/local/bin/gcc-9
    OMPI_CXX=/usr/local/bin/g++-9
    export OMPI_CC OMPI_CXX

------------------------------------------------------------------
It tells you to move to the default build directory using cd build,
after what you can type make. To speed up the compilation you can
use more computing power by adding a -j option. For example
make -j4
will start 4 compilations at once (thus keep 4 cores busy all the time typically). Note, that the compilation can take some time.
Running a test example
The ARES repository comes with some standard examples for LSS analysis. Here we will use a simple standard unit example for BORG. From your ARES base directory change to the examples folder:
cd examples
We will copy a few files to a temporary directory for executing the run. We
will assume here that $SOME_DIRECTORY is a directory that you have created
for the purpose of this tutorial. Please replace any occurence of it by the
path of your choice in the scripts below. We will also assume that $ARES
represents the source directory path of the ares tree.
mkdir $SOME_DIRECTORY
cp 2mpp-chain.ini $SOME_DIRECTORY
cp completeness_12_5.fits.gz completeness_11_5.fits.gz 2MPP.txt $SOME_DIRECTORY
cd $SOME_DIRECTORY
In the above, we have copied the ini file describing the run, then the data file (survey mask) and 2M++ data file for BORG. To start a BORG run just execute the following code in the console:
$ARES/build/src/hades3 INIT 2mpp-chain.ini.txt
BORG will now execute a simple MCMC. You can interupt calculation at any time. To resume the run you can just type:
$ARES/build/src/hades3 RESUME borg_unit_example.ini
You need at least on the order of 1000 samples to pass the initial warm-up phase of the sampler. As the execution of the code will consume about 2GB of your storage, we suggest to execute BORG in a directory with sufficient free hard disk storage.
You can also follow the Aquila tutorial
You can find a tutorial on running and analysing a BORG run in the scripts
directory of the ARES base directory:
$ARES/docs/users/building/Aquila_tutorial_0.ipynb. It is a jupyter
notebook, so please have a jupyter running. We
provide access to the content of this notebook directly through this link to the notebook.
It illustrates how to read and
plot some of the data produced by BORG.
Switching to another branch
Follow these steps to switch your ares clone to another branch (starting
from the ares/ directory):
git checkout user/fancy_branch
git pull
# (the above step should only be necessary if you are not on a fresh clone and have not pulled recently)
bash get-aquila-modules.sh --branch-set
bash get-aquila-modules.sh --status
# ( verify that it responds with "all clear" on all repos)
bash get-aquila-modules.sh --pull
# ready to build: (make clean optional)
cd build ; make clean ; make